Zachary Handcrafted Guitars
Owner's ManualTed Noiz says... Don't be an IDIOT !!!
I say, don't be a moron and read everything on these Owner's Manual (care and maintenance) pages. Its very valuable and amazingly free information for you. You will learn a lot and don't even have to thank me for it. Knowing there is one less idiot in the world is satisfaction enough for me.
Here are the rules: I have found the best way to take care of a Z is,
1st - Don't fuck with it! Don't do anything to it!
2nd - When you are finished playing it, wipe it off with a soft cloth and put it back in the case until you are ready to play it again.
3rd - Don't let anyone else fuck around with your Z! Sure as hell don't let it out of your sight - don't let anyone borrow it! Ted Noiz
Repair Horror Stories - Don't let it happen to you
Introduction
Play-wear is fine, but abuse (through neglect or stupidity) irritates me to no end....
I put a lot of time and soul into building these guitars and since they are quite different in many ways from other guitars I am giving you some information for reference so that you or anyone else will not damage the guitar. The more information you have the less likely that you will damage it.
THE FIRST THING TO REMEMBER - Don't do
anything stupid!
Your Zachary guitar leaves my
shop in its optimum playing condition. Everything is set up to make the guitar
function as good as it can. I strongly suggest that you not touch it in any
way to modify the set up. Unless you abuse the guitar or expose it to severe
climatic conditions there is a good chance that you will never ever have to
adjust the guitar.
Don't do anything to your
Zachary guitar to modify it. I have suffered over this design for a long time.
Everything is designed and built to work together as a unit a certain way.
If you change just one thing you will upset the balance of the design. Don't
be neurotic! Remember that there is no such thing as a perfect instrument.
You can always pick at little things, but if the instrument functions well
as a whole, then you have a fine instrument. The less you do to your Zachary
guitar the happier the guitar will be. Just take good care of it and play
it! These are the only two things your guitar needs.
THE MOST IMPORTANT RULE
If you are not 110% sure about what you are doing, DON'T
DO IT !!!
If it ain't broke, don't fix it !!!
If
your guitar needs repair
If you are not skilled or do not have enough experience
working on guitars, do yourself the favor and take your Zachary guitar to
a professional, the best professional repair technician in your area. He may
not understand the guitar fully so explain to him some of the details or give
him this Owner's manual before he touches it. Zachary guitars are very different
from standard designs and they differ in how they are made and put together.
If someone does not understand the intricacies of the guitar they will ruin
your instrument and it will never be the same. Remember even the best repair
technician can do stupid things.
Definition
of a Professional Guitar Repair Technician
A professional is not necessarily someone
who is smarter or more talented than you are. It's someone who has already
made all the mistakes and has learned all the tricks of the trade. Most likely
a professional will not make mistakes when working on your guitar,
more specifically they will not be learning on your guitar or working by trial
and error. I will not be responsible for any damage to the guitar caused by
you or anyone else. Please, if you need any repairs on your guitar, find the
best professional repair technician in your area.
The
Perfect Setup
The guitar I send you has been set up to its optimum.
Do understand that everything on a guitar is a trade off. Example: If you
want a very low action, your guitar will play effortlessly but it will buzz
and loose much of its tone. I try to arrive at a happy medium and I have determined
this through years of trial and error.
My
shop Setup The Perfect
Setup
Remember to always take all measurements with the guitar
in the playing position. Use a small metric metal ruler and stand it up on
the 12th and 13th frets to measure string height at the 12th fret. It is very
important for you to maintain these specifications to ensure that your Zachary
guitar plays as it was designed to. String height is measured from the top
of the 12th fret to the bottom of the string in playing position.
Neck
Relief (almost nonexistent)
I like an almost perfectly straight neck. Measure neck
relief by using the Low E string as a straight edge and determine neck relief
around the 7th fret. You make the Low E string into a straight edge by pressing
it down simultaneously before the 1st fret and also behind the last (24th)
fret. The string should be (about a business card width or less) above the
7th fret as you glance down in a playing position. Too many players as well
as some repair technicians make the mistake of putting too much relief into
the neck. Yes they stop most of the buzzing but the neck plays like a dog.
Remember you should have almost no relief or curve in the neck. Always measure
neck relief in playing position as well.
String
Height
Sting Height is always measured from the top of the
12th fret to the bottom of the string as you are looking down on the strings
in plying position.
These are the minimum measurements. Don't make the action lower than this.
You can go higher but not lower.
High E - 1.5mm
Low E - 2mm
I am always striving to set up the neck with virtually no relief and the high
E string at 1.5mm and the low E at 2mm above the 12th fret.
A guitar set up this way will play like a dream. It will buzz a bit, but you
won't hear it through the amp. Remember some buzzing is normal. You have metal
on metal, right?
Truss
Rod Adjustment (DANGEROUS
TERRITORY)
Chances
are that you will never have to adjust the truss rod. This is because it is
a stiff double action rod made up of an active and a passive rod. If you don't
know what I mean, don't worry about it. The important thing to remember is
that this rod keeps your neck straight very well and it does not need the
periodic adjustment that regular single action rods need. So again, its best
if you leave it alone.
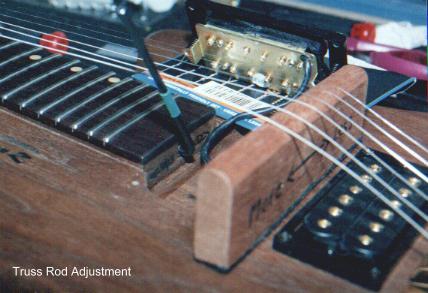
If however you see that your neck has developed too much relief or the relief has disappeared altogether, then its time to adjust the rod. The truss rod is located at the body end of the neck. You must remove or really loosen the strings and unscrew and lift out the neck pickup to access the truss rod nut. On guitars with locking tuners you will have to unlock the strings at the tuner end. For regular tuner (non-locking) equipped guitars I use a specific tool which I made for the purpose of lifting the loosened strings high enough to remove the pickup. This piece of wood is about 1.75 inch high with felt glued to the bottom of it so that it will not scratch the top of the guitar when I slide it under the strings. I slide this piece of wood underneath the loosened strings. This keeps the strings suspended high over the top of the guitar. This allows me to unscrew the four neck pickup mounting screws and carefully lift and slide the pickup out from its cavity. Be smart and place a piece of cardboard or leather underneath the pickup so that it does not scratch the top of the guitar. With the pickup out now you can adjust the truss rod using a 9/64" Allen wrench. This is a sensitive double action truss rod and a quarter turn is more than enough. If you turn clockwise you will straighten the neck (less relief), if you turn anti-clockwise you will put more relief into the neck. Remember, never force the rod when you are adjusting it. After you are done put the pickup carefully back in and tune the strings to pitch.
VERY
IMPORTANT! Whenever you adjust the
truss rod, you must put pressure and bend the neck physically in the direction
you would like the neck to go at the same time as you turn the truss rod nut.
This way you will not rely solely on the rod to bend the neck. Bend the neck
first using your weight and then adjust the nut to hold this setting. The
best way to bend the neck to add relief is to carefully place the headstock
on a padded support and then press down in the middle of the neck as you truss
the trussrod.
If you want to remove relief then bend the neck the opposite direction by
potting a padded support underneath the middle of neck while pressing down
on the body and the headstock, adjusting the nut at the same time.
You are now getting into dangerous territory and if you are not an expert you will get into a lot of trouble and destroy your guitar. Better take it to a professional repair tech but have him understand my recommendations as well. Print out this page and give it to him. Remember he only has to screw up once and that's it.
Tremolo
Set-Up
The only thing to remember here is that when the guitar is tuned
to perfect pitch the tremolo base plate must be parallel
to the top of the guitar.
Tremolo
Springs on Zachary guitars
Zachary Tremolo Springs have been custom made specifically for
Zachary guitars. They are not anything like the standard Stratocaster springs.
They have different tensions and different lengths. The Zachary tremolo is
a delicate mechanism, designed to balance a certain way and which cannot be
disturbed.
Its a fine balancing act to say the least. It only can function as a unit. Custom tremolo unit, with a cut down block, custom springs, custom nut and custom ZOG strings. These are the elements which all work together to allow this tremolo unit to function. You disturb or change any part of it and it simply will not function or stay in tune properly.
The Zachary tremolo unit only needs two springs but they are proprietary springs, custom made for Zachary guitars and specifically calculated in tension to work with the Zachary tremolo. These springs are also specific calibrated to the particular scale length of your guitar. I choose from 4 differently custom Zachary springs to arrive at the exact tension combination needed for each guitar. Often the two springs are dissimilar in length and tension, in order to arrive at the correct overall tension. This is a deliberate design feature for the specific tension requirement of your guitar's scale length.
Never change the springs, or your Zachary trem will no longer stay in tune or function properly. For the Zachary Tremolo to function, you must use ZOG strings. ZOG 10 or ZOG 11. Nothing lower than ZOG 10. The tremolo will simply not function properly and not stay in tune with lighter strings. Using different Springs or Strings will basically make your Zachary guitar unusable.
Pickups
There is not much to say about pickups. Don't put them
too close to the strings it will kill your tone and sustain. The magnets from
your pickups will dampen the vibrating strings.
Controls
You can get many different sounds from the switches
and the volume pot. You have a master volume (that's all you need) and no
tone (who uses the tone anyway?) The volume pot actually functions as a tone
pot as well (very clever Alex). I did not place a capacitor on the volume
pot. Therefore if you turn down the volume a touch, it will darken your tone.
In other words, it will simultaneously take away some of the high end. You
have two mini-switches. The one closer to the bridge is simply a three-way
toggle switch. It activates either pickup separately or together. The mini-switch
closer to the jack is a coil switch. It works on both pickups at the same
time. If you flick it toward you, you have both pickups in single coil mode.
Away from you puts both pickups in double coil (humbucking) mode.
Removing
the Control Cover
Some covers may be tight. In this case you cannot grab onto it so they not
want to come out. NEVER pry a cover open. You would be an idiot to do that
and you will mangle the guitar. Here is a very easy solution if the cover
must be removed. Go to any dollar or hardware store and buy yourself a suction
cup. The kind they buy for store windows to hang signs on. Get one of these
suction cups and press it down on the cover and then just lift. Take a look
at the picture provided and you will know exactly what I mean. This suction
cup will lift even the most stubborn control covers. Take a look at the picture.

The
Different Sounds
You will notice the variety of sounds you can get with
the different pickup and coil combinations. In double coil mode you will get
the regular thick humbucking tone. In single coil mode you will get a much
thinner but more focused tone. When pickups are used together, in double coil
mode you will get a more out of phase tone and in single coil mode you will
get a nice twangy Strat-like quack sound.
Strings
(DANGEROUS TERRITORY)
You must always use
Zachary Optimum Gauges (ZOG) string set
that your Zachary guitar was designed for and set up with. By default all
Zachary guitars will be set up with ZOG 10 round wound strings. This gauge
of strings will provide you with the best combination of playability and tone.
It's a very versatile gauge. If you stay with this gauge you most likely will
never have to make any truss rod or bridge adjustments. On guitars with a
24.5" scale only, use the heavier ZOG 11 set to compensate for the shorter
scale.
I would recommend that you use only Zachary Optimum
Gauges (ZOG) set of strings. All trem gutiars must
take ZOG 10 or ZOG 11 sets only, nothing smaller. Unless specified, all guitars
will be set up and shipped with ZOG 10.
Your Zachary guitar was adjusted and intonated for this set. Using other gauges
and brands of strings would throw off your set up.
Changing
Strings
Always change strings one at a time. This means, do not de-tune or remove
any of the other strings. Keep them at pitch and only remove one string at
a time, put on the new string, tune it to pitch and then move on to the next
string.
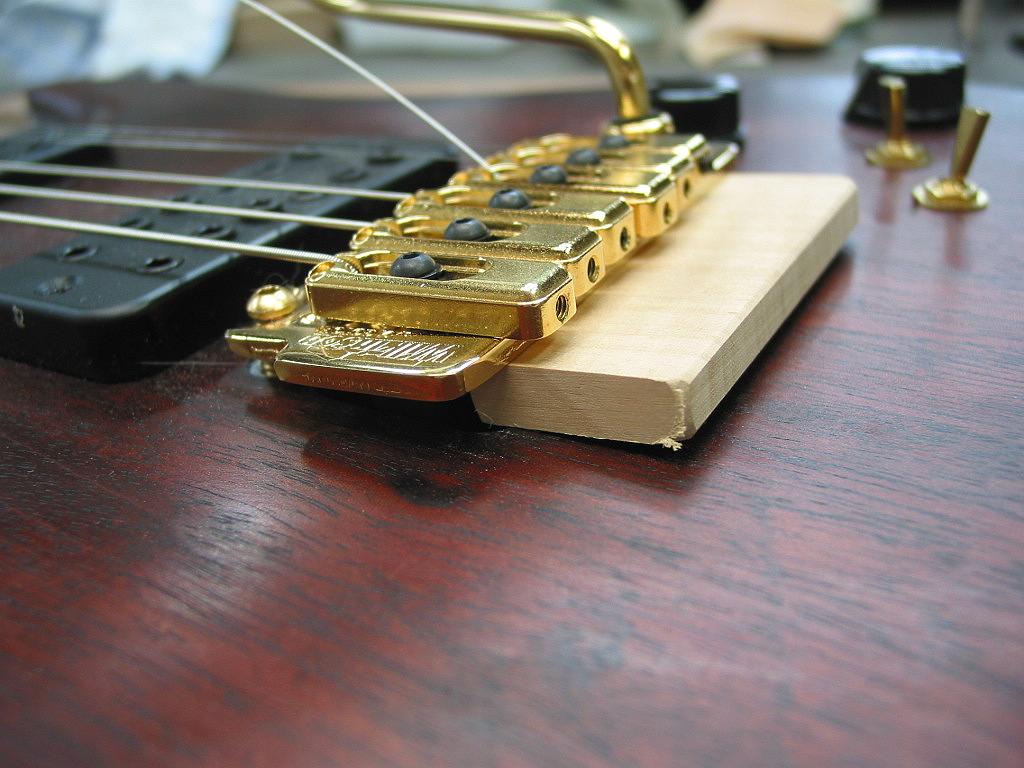
For Tremolo guitars it is a bit more complicated. You have two powerful springs attached to the tremolo bridge. These springs must be supported when tension is released from even one string. Supporting the tremolo will also make working on the guitars much easier. Not supporting the tremolo bridge may result in some kind of damage to your guitar and it is just not the proper way to change the strings.
Remember this is a very different tremolo and the way its set up when compared to a Fender Strat-style guitar. The Fender tremolo rests on the guitar top. The Zachary tremolo is fully floating and quite high up off the guitar top. Therefor it must be treated differently. If you understand how its different you will then handle it with knowledge and common sense.
If I did not provide you with a support block then simply make one yourself out of virtually any material, preferably something softer so that it does not damage anything on the guitar. The best material to use is a piece of softer wood. Find the correct thickness or glue up the correct thickness and make yourself on of these little supports. Keep it in your guitar case, next to the box of condoms (just kidding). You can never be too safe.
This trem support should be the correct thickness. It must place the bridge just a bit higher than normal playing position. As you know the normal playing position of the bridge plate is parallel to the guitar top at its zero position. The bridge support should be a bit higher, making the bridge lean forward a bit. This forward lean of the bridge will also enable you to putll the strings nice and tight through the locking tuners, giving you less wrap around the tuner. Just look at the pic below for the correct size and positioning of the trem plate support.
The
Finish
The finish of your guitar is a combination of a hand
rubbed oil resin and several layers of Carnuba based wax topcoat. Be sure
to never use any commercially available guitar polishes. This will
ruin the natural finish of your Zachary Guitar. These polishes are meant for
lacquer or plastic finishes only. If you ever use any solvent, grease or alcohol
based cleaners to wipe your guitar, disaster will result. You will take the
finish right off. You will also remove the wax which helps to seal the wood
against the elements. You do not have to do anything to maintain the finish,
just leave it alone and it will age gracefully.
I repeat, DO NOT clean your Zachary guitar with ANYTHING. You are an idiot if you ignore this and will remove the finish and the protection from the wood of your guitar. The guitar will not need any cleaning.
Dents
and Scratches
Many Zachary guitars are made of softer woods. This
means that without a thick layer of surface finish the wood is always exposed.
Although there is no finish to scratch or chip, the wood itself is always
in danger of being dented or scratched. The softer the wood the more fragile
it is. Anything will scratch or ding your Zachary guitar, even your fingernail.
Keep your guitar away from belt buckles, zippers, and buttons. Be careful
around sharp object like the edges of tables or anything else that may bump
your guitar. I also have to be very careful when I am building these guitars.
The
Nut
I make string nuts either out of a certain metal or
a secret "Mission Impossible" synthetic materials. I try not to glue the nut
in but sometimes I have to either glue or use a thin layer a melted beeswax
to secure the nut in place so that it does not move. To remove the nut, grab
it with some small serrated pliers and make sure you pull straight up from
either end of the nut. Don't wiggle the nut back and forth because you will
crack the short fingerboard overhang in front of the nut slot. Fingerboards
are made of very hard wood and these woods are usually brittle and they can
break and crack easily. If the nut wears and you want to raise it, I suggest
that you do not have a new nut made, just use the original nut and put a small
paper shim underneath it. If a new nut has to be made, make sure that the
string slots are cut into the nut at a very shallow angle. Since the string
angle is shallower than on most other guitars the nut slots also have to be
shallow in angle. If you cut the slots too steep the strings will rattle in
the nut slot in the open position since the string-line to the tuners is virtually
straight and not angled. Also, please remember to make the string spacing
on you new nut identical to the spacing on the old nut. Again don't attempt
any of this unless you have already destroyed other guitars in the past and
you have gained the proper experience to not destroy your Zachary guitar.
Removing the Bolt-On Neck (VERY DANGEROUS TERRITORY)
Just remember this, if you are too lazy to read what is below!
The neck screws must be removed in sequence and installed in reverse order.
This is of the utmost importance because of the design of the Zachary neck pocket.
Only remove the neck as an absolute necessity. On my
bolt on neck models the necks screws function differently from how its done
on other guitars. In other guitars and all Fender guitars, the screws do not
thread into the body wood at all, they only pass
through the body, they do not actually thread into the body. On all other
guitars the neck screws only screw into the neck, not the body. On a Fender-style
guitar, screws only pass through the body portion and only screw into the
the actual neck wood.
On Zachary guitars, either one, or two (on older guitars) screw into both the body wood, as well as the neck wood. On most Zachary guitars (except for the very few early ones) there are a total of 5 neck screws and 4 of these screw into the neck wood only (just like on a Fender), only passing through the body wood. The middle screw (on the 3 screw side), threads into both the body wood and also into the neck wood as well. This is to guarantee a super stable neck joint with absolutely no neck movement. I hope you understand what I mean.
If the screw threads only into the neck, it only pulls the neck down into the pocket. However if the screw threads into both the body and the neck it anchors the neck horizontally as well. This is important so the neck does not move horizontally or sideways, like Fender does.
This is why you must follow the specific order of sequence when disassembling and assembling a Zachary neck. This is very important that you understand the concept and follow the sequence.
If you need to removed the neck (I hope you never do), here is the sequence of steps you must follow. You will see this is not complicated, its just logical. However, I cannot assume that you have common sense or mechanical and technical reasoning, so I will tell you what to do here.
Removing the Neck
When you want to remove the neck. Remove the center screw (on the 3 screw side) first and then remove the other 4 screws in no particular order, as long as you take the middle screw out first. The middle screw on the 3 screw side is the one screw, which threads into both the body and neck woods. The rest of the screws only thread into the neck and only pass through the body. This is why the middle screw must be removed FIRST and installed LAST.
Installing the Neck
When you are installing the neck you must
follow the sequence again but in reverse order.
This is very important.
Position the neck back into the neck
cavity with the neck screw holes perfectly aligned with the screw holes in
the body.
You first
screw in the perimeter screws. A mentioned above several times, these screws only screw into the neck and only pass through the body. Leave off the center screw for now.
Make these 4 perimeter screws nice and tight
but without stripping their thread in the neck. Have some feel and fineness about it. You are not working on an oil rig.
Only after these 4 perimeter screws (that only thread into the neck) are really
tight, should you screw in the center screw, which threads into both the body
and neck.
I call this middle screw the anchor screw
because they do not just keep the neck on the body, they also anchor the neck
and stop the neck from moving in any horizontal direction. Leo Fender should have thought
about this. O well, I wasn't even born to help him.
Clear as mud? Good. Leave
this to the pro and give him these instructions so he does not screw up.
To Summarize - Please note: On all Zachary guitars, which have a 5 bolt neck attachment, only the center screw on the treble side of the neck is an anchor screw which threads into both the neck and the body. It is very important, as outlined above, that when removing the neck this anchor screw be unscrewed first and also extremely important that this screw be screwed in last when putting the neck back on the body. Screw in the four perimeter screws first, make them tight and only then should you screw in the center anchor screw. The other four screws should be already tight before this screw is installed.
There is no room for error here. If you mess it up, you will strip the threads in the wood and/or will not have the screws support your neck as they were designed to do.
How
To String Gotoh Locking Tuners
I don't use Sperzel tuners
any longer, so I have a new page up especially on Gotoh locking tuners.
Click here for this important information on how to work GOTOH
LOCKING TUNERS
Storage
As you may have guessed, because of the headstock design
you can't hang a Zachary guitar in the conventional sense. You must store
your guitar either in its hard shell case or use what they call an "A frame"
stand. I would strongly recommend that you purchase the best stand there is,
namely the K&M folding "A" frame stand made in Germany. This
stand is extremely safe because it has a very low center of gravity and it
is practically made for the Zachary Guitar. Like the Zachary guitar it is
a marvel of human design. If you can't find it at a local shop I will sell
you one and send it to you. Highly recommended!
Please note that the K&M A-Frame stand only works on Z1, Z3 and D1 body
guitars. It will not work for the Z2 body style. To date, I have not found
any stand that will work with the Z2. If you place the Z2 on a stand it will
fall and the guitar will be ruined, you will cry and so will I. The Z2 has
a habit of slowly sliding off the stand. So it may look like its staying on
and when you return an hour later you will find your guitar on the ground.
Not a pleasant site.
Packing and Shipping a Zachary Guitar (or any guitar for that matter)
I find that the way you pack something really tells volumes about your personality, character, intelligence and competence. If you are an untalented lazy slob in life, you will pack accordingly. If you are intelligent and meticulous with details, you will also pack accordingly. So don't be a slob or you will loose the guitar and suffer irreparable damages. Then you will feel like a worthless POS for the rest of your days. Let's try to avoid that by giving you this very important information.
You need to first find the perfect guitar box. Go to all your local music stores until you find a perfect box. They should have lots and will give you one for free. They throw them out anyway.
The perfect box will be a rectangular box, which will give you at least 1 inch of space between your guitar case and all inside walls of the box, on all sides and top and bottom.
Very Important
Before you place the guitar case in the box, you must secure the guitar inside its case. Its very important to see if there is gab between the body of the guitar and the bottom of the case. Usually at the neck area. If there is gap there at all, as there is in most cases, then place a good thick layer of bubble wrap, foam or even crumpled newspaper under the body, so as to have the guitar body rest on this cushioning. Never leave any gap between the bottom of the body and the floor of the case. Its very dangerous to do so. If there is gap there, it means that the weight of the guitar will be supported by the neck and not the body. You don't want any weight on the neck. The cushioning you place under the guitar body will take up the gab and support the weight of the guitar, instead of having the neck in its cradle support the weight of the guitar. If there is a gap under the body all the weight will be concentrated on the neck and the neck can snap off, or the neck joint be damaged if the box is dropped just right. This has happened to many brands of guitars in the past.
Remember that these boxes are often placed on top of other boxes and they could be as high as 10 feet in above the ground. Also these boxes travel and fall off of conveyor belts. Even if your guitar is packed very will but the guitar is still loose inside the case, with a gap between the body and the bottom of the case. The guitar will still get a jolt and if its not properly supported inside its case, it does not matter how well its packed outside the case. You don’t want a big jolt to be taken by pressure on the neck. Its better to actually have the neck of the guitar a bit higher then its neck cradle supports in the case. It is actually preferred that the neck does not actually touch any of these neck supports and sits slightly up in the air inside the case with the guitar supported by its body and the cushioning under the body. The goal is for the neck not to be subjected to any pressure or impact if the packed guitar is dropped or suffers a jolt.
Once you pack the guitar in its case according to the info above and you got the perfect box, you can start packing the box.
Put a good thick layer of peanuts on the bottom of the box, place the guitar case in the middle of the box on top of the bottom layer of peanuts. Then slowly pour peanuts equally on all four sides, stopping and tapping the sides of the box hard, so the peanuts settle. Do this several times before you get to the top. When you fill all four sides with peanuts then put an equally thick layer on top as you did on the bottom. After you have poured the top layer, the box should be hard to close. The top lid of the box should be very hard to close. Get some help and push the guitar case down into the box by pressure and force the top box flaps shut under pressure and tape it good.
Check the taping on both the bottom and top ends of the box, to make sure its very strong.
NOTE:
You should get another person to help you with the packing, such as pouring of the peanuts while you tap to sides of the box and also with the and closing of the top flaps.
I hope my explanation is clear and makes sense. We don’t want to loose a Z guitar in shipping. That is just a waste and very stupid. The problem is that these guitars, as you know, cannot be duplicated or replaced exactly, so take you time and do a great job packing. Consider the couriers as inconsiderate, lazy neanderthals, who don't give a shit about what's in the box. Also thousands are boxes are shipped at any moment and there is no time for any TLC when doing their job.
Use
Common Sense
Treat the guitar like a baby. Don't leave it in the
cold, don't leave it in a hot car in the middle of summer. Don't store it
in a humid basement, don't leave it in a very dry area with the forced air
heating system on, don't leave it near little kids or un-supportive spouses.
Always be conscious of the humidity of the environment where the guitar is.
Don't let little kids play with it and don't let the old lady throw the guitar
at you when she is angry (I'm speaking from experience).
Last but not least. If you are a Zachary guitar owner, I sincerely want to thank you for your support. I put a lot of pride into my work and suffer for my guitars. I hope you enjoy it. Alex
Sadowsky Bass Guitars Guitar